Branch & Committee How-To
Table of Contents
- Branch and Committee Administration
- Manage Branch & Committee Rosters
- Website Permissions & Alerts
- Branch Pages
- Committee Pages
- Manage Committee Materials
- Schedule & Manage Events
- Add a Blog Post
- Branch eNewsletters
BRANCH AND COMMITTEE ADMINISTRATION
Documents, links, and resources related to the volunteer work of serving on a committee or branch - this is what helps to keep our programs running! Please feel free to upload resources of a general nature that other branches or committees may appreciate.
Manage branch & Committee Rosters
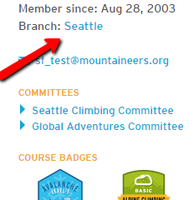
To view or manage your committee's roster, first find the committee on your My Profile page or from our Locations & Lodges page.
Click on the "Roster" button in the orange admin panel to view more detailed information, download the roster, add people to the roster, edit roster records, and remove people from the roster. You'll find "Download All" button at the bottom of the roster, the "Add Person to Roster" buttons at the top of the roster page and an "Edit" link next to each person's name. Clicking on a person's name will take you to their My Profile page.
There are leader and instructor expiration dates on the committee rosters. Please note that these are only for administrative purposes so that you can keep track of when leaders/instructors need a refresher. The expiration date DOES NOT actually remove someone's leader or instructor status on a roster.

website permissions & Alerts
Website permissions are granted from branch and committee rosters. The following roster "positions" have the corresponding permissions.
Branch Council: Admins
- Edit your branch's "about us" page and your committees' pages.
- Add to or edit your branch council roster.
- Add and manage your branch's committee and subcommittee rosters.
- Add and manage your branch's and committees' courses.
- Add events to your branch's calendar.
- Add blog posts to any blog on our website.
Committee: Admins
- Add to or edit your committee roster.
- Edit your committee page.
- Add and edit any committee materials (folders, files, pages, etc).
- Add and manage courses.
- Add and manage activities.
- Add and manage subcommittees.
- Add events committee or branch calendars.
- Add blog posts to any blog on our website.
- View committee materials from other committees where the committee has permitted that via the "Share with leaders?" checkbox (changed by editing the committee) and setting the state of each item to be shared to "Shared with committee." Learn more about states in our The 3 P's on our new website: Private, Pending, and Published blog post.
Committee: Leaders
- Schedule activities (trips, lectures and field trips) sponsored by your committee.
- Suggest new Routes & Places using the edit form. Learn more from the Requesting New Routes & Places page.
- Add blog posts to any blog on our website.
- Add events to branch calendars.
- View committee materials from other committees where the committee has permitted that via the "Share with leaders?" checkbox (changed by editing the committee) and setting the state of each item to be shared to "Shared with committee." Learn more about states in our The 3 P's on our new website: Private, Pending, and Published blog post.
Committee: all personnel
- View, email, and download the committee roster.
- View committee materials with the "Shared with committee" state.
- Note: Committee positions (Chair, Secretary, Treasurer, Member) and Instructors are mostly for tracking purposes, but we frequently send messages only to people in those roles, which allows us to cut down on the spam to everyone else.
Administrative alerts
In addition to positions, there is a checkbox called "Administrative Alerts". If checked, that committee member will receive an email notification each time a committee member is added, removed, or updated if the updated was part of one of these fields:
- Position
- Leader, Instructor, Admin Flags
- Admin Alert Flag
- Badges
- Notes
branch pages
Keeping content, up-to-date webpages is a full time job. The branch "home" pages were designed to highlight events, blogs, and the courses and activities that each branch regularly sponsors - rather than being a page for lots of content that must be constantly updated. This page has two fields that can be updated to give your branch page a new feel, which are the image and summary. Branch "home" pages are designed to use banner images which must be exactly 975 x 370 pixels. Below are some details about the portlets on the branch "home" page.
Branch News
This area is populated by branch blogs and shows the five most recent blog posts. If your blog is not showing up in this area, edit the blog post and be sure that your branch (e.g. Kitsap Branch) is in the "Tags" field on the "Categorization" tab. See the blog instructions below for more information.
About Us
This portlet is the link to your branch's "about us" page that branch council admins may edit. It is designed to be a page that can be updated as needed but is best with more "evergreen" content about your branch. Note that this page is also the branch council committee page, so this is also where you update the branch council roster. Edit this page as you would a committee page described in the next section.
Courses & Activities
This portlet is the link to a page that highlights all of the courses and activities your branch committee sponsors. There was a deliberate choice to exclude the word committee from the course & activity buttons because our member studies found that people are far more interested in reading about the different types of courses and activities than learning about the governing body we call a committee.
Events
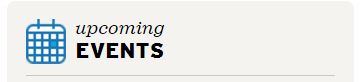
This portlet lists the next six events that are listed in your branch's upcoming events calendar. See the event instructions below for more information.
committee Pages
The committee page is a great place to share detailed information about the kinds of activities, courses, and events your committee sponsors. The committee page is designed to be easily edited by committee admins. It also contains a "Committee Materials" portlet that shows the materials your committee regularly uses and has shared. Find your committees on your My Profile page or from our Locations & Lodges page.

When you choose "Edit" from the admin panel of your committee page, you'll be able to edit the content on that page. Here are the fields where you will enter and edit content:
Title
Your committee's name.
Summary
A brief description of what your committee does. It should be no more than three sentences.
lead image
An image that best represents your committee's activities, courses, and events. Committee page images are best if they are 400 pixels tall or wide and less than 265 pixels in the opposite dimension. Note that if the image has a width of 1.5 times its height or greater, the page will display it "banner-image" style, but it won't appear as a good banner image unless it has exact dimensions of 786 x 370 pixels.
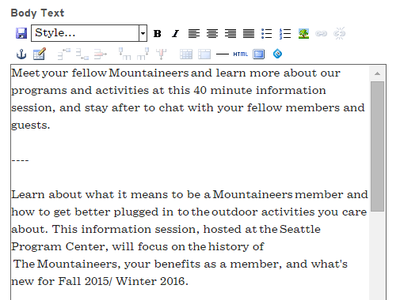
Body text
This is a rich text field which means it is edited like a typical word processing document such as Microsoft Word. You can add videos, images, tables, bullet lists, and numbered lists, and you can format text with several different styles and link to other content. Review our Publications Style Guide for proper usage and content guidelines. Here's what all the buttons do:

Manage committee materials
locate your committee materials
To manage your committee's documents and folders, first find the committee on your My Profile page or from our Locations & Lodges page. Then click on "Contents" in the orange admin panel or "Committee Materials" in the portlet at the right side of your committee's page.

add materials
You can add folders, files, pages, links, and other types of content to the top level of your committee materials or navigate to a folder at a deeper level from the existing folder structure by clicking on the titles.
To add a new item, click on "Add new..." in the admin panel and choose the type of the item you need to add. Enter the information needed and then click the "Save" button at the bottom of the edit form.
Edit content and materials
Click on the title of the item you need to edit. Then click the "Edit" button in the admin panel. Make the necessary changes and click the "Save" button at the bottom of the edit form.
Cut, Copy, Paste, Clone, Delete, and Rename
While viewing the contents of the desired folder, check the boxes next to the desired item(s). Then click on the desired button. If you choose "Cut" or "Copy," wait until the message stating this task was completed appears at the top of the page. Then navigate to where you wish to place the item(s) and click the "Paste" button.
- It is best to create courses and activities from scratch rather than copy and pasting.
- Course templates, activity templates, and committees (including subcommittees) cannot be deleted, but may be retired. See the next section, Publishing and Retiring Content, below.
- Blog posts, activities, courses, and events may not be deleted. Whether these are visible can be controlled by publication state and registration open, publication, registration close, and expiration dates. If you create any one of these items in error, please contact Member Services at info@mountaineers.org for assistance.
- Events, Lodge Stays, and some Activities may be cloned, essentially a fancy copy-and-paste process that allows you to choose the things that are typically different about that item like start and end dates. Look for "Clone" In the "Action" menu in the yellow admin panel just under the header when viewing an event, lodge stay, or activity.
- It is best to "rename" items one at a time. Renaming allows you to change the title and the "short name" (the part that shows up in the URL of the item). You may change the title (but not the short name) when you edit an item.
publishing and Retiring content
Content you add is set to the "Private" state by default. You may change this to share materials as needed. Here are the states:
- Private: Only the creator and committee admin may view and download.
- Pending: Only the creator and committee admin may view and download. This status exists purely for admins to mark items for review between themselves before sharing more broadly.
- Shared with committee: Anyone on any committee roster can view and download.
- Published: ANYONE, logged in or not, may view and download.
- Retired: Website administrators (staff and a few key volunteers) may view. This is essentially deleting content to which you no longer need to use, but that we need to keep for historical reasons. Content that may be retired are course templates, activity templates, and committees (including subcommittees).
Learn more about our different privacy and permission settings on our blog!
Schedule & Manage Events
For Seattle and Tacoma Program Centers
- Reserve a room at our Seattle Program Center.
- Reserve a room at our Tacoma Program Center.
- Reserve the Irish Cabin Property.
FOR all branch events not held at the pROGRAM CENTERS
Step 1 Navigate to your branch page from your My Profile page or from the Locations & Lodges page. Note: Contact our Outdoor Centers to reserve space at one of them for your group or visit. They will add your event or lodge stay to their calendar once you've worked out the details.
Step 2 Click on the Upcoming Events portlet at the right side of the branch page.
Step 3 Choose "Event" from the "Add new..." menu in the orange admin panel on the left side of the screen, or by clicking the blue Add Event button on the right side of the screen (all leaders and committee admins can add new events).

Step 4 Enter your event details (title, summary, dates, etc).
Step 5 Tag your event to make sure it shows in the calendar you want it to. See the glossary of tags to learn about some of the most common tags and how they are used.
Scroll down to the Categorization section and choose your branch tag (ex: Everett Branch). Please note this is a type ahead search and add field, so if you start typing in the name of your branch the tag should appear. Tagging is case sensitive! If you type and add a tag with all lower case lettering instead of using the existing tag from the drop down list your event will not populate correctly. For example, you need to use "Tacoma Branch" and not "tacoma branch".

Step 6 Click the "Save" button. If the event is ready to be viewed by the public then go ahead to Step 7. If you aren't ready to publish your event, you can always wait and edit it later - it will be listed with you as the leader in your My Activities area.
Step 7 For everyone to see your event, you need to "publish" it. If you leave it "Private," only your branch and committee members may view it. To publish your event, choose "Publish" from the "State:" menu in the orange admin panel on the left side of the screen.

Adding tickets or rsvps to an event
At this step, you should determine if your event requires paid or free tickets, or RSVPs.
Tickets are required for paid and free public events. This includes events that are open to members and non-members who are purchasing tickets for themselves and others. Some examples include Beta & Brews, speaker events, banquets, volunteer appreciation dinners, etc.
If your event is open to members only and has no ticketing cost, the event is considered RSVP. Each individual must RSVP on their own Mountaineers account. This includes branch council meetings, committee meetings, etc.
If you are reserving space for a course or activity with no tickets and no RSVP required because you are managing attendance on another roster, please leave all fields in the "Tickets & RSVP Details" section blank. You'll be able to add an expected attendance in the "Room Info" section if you're reserving space at one of our program centers. Events like this should have the "Programs & Meetings" tag.

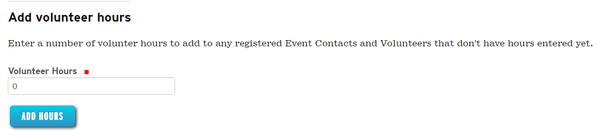
Got a committee meeting on the calendar?
Did you know that you can make the RSVP default to "Volunteer" as the role. This means if committee members are signing up online then you'll be able to award volunteer hours all in one fell swoop once the committee meeting is over.

You'll find this at the bottom of the roster:
Please note that the Location field is no longer a type-ahead field. You'll simply want to enter the location and then enter the address in the field below.
If you type in the address in the map box or a city name you can then move the map location bubble to the exact location that you need.

GlOssary of Event Tags
- Home Page: For events that will be of interest to members and the general public.
*This tag puts the event in the main list on mountaineers.org/events. The top three (most imminent) are displayed in the event portlet on mountaineers.org. - Programs & Meetings: For events that are open only to members of a committee or registrants in a course.
*This tag is a primary filter option on “Find Events” and is the opposite of Member Events (most events are tagged with one or the other but not both). - Member Events: For events that will be of interest to members. This can include events that are open to the public (guest members) and events that are open to certain members based on experience or interest, e.g. “Scrambling graduates from any branch” or “Current and prospective Urban Walk leaders”.
*This tag is a primary filter option on “Find Events” and is the opposite of “Programs & Meetings” (most events are tagged with one or the other but not both). - Virtual: For events that are hosted hybrid or virtual.
*This is a primary filter option on “Find Events”. - ___ Branch: For events being sponsored by a subcommittee of said branch OR are member events that are within reasonable distance for attendance from said branch. A meetup in Kirkland, for example, might have “Seattle Branch”, “Foothills Branch”, and “Everett Branch”.
*This tag puts the event onto each of the listed Branch calendars. - All Branches: For virtual or large-scale, organization-wide events OR events associated with committees at all branches.
*This tag puts the event onto all Branch calendars. - Seattle Program Center / Tacoma Program Center: For events being hosted at a Program Center.
*Creating the event from the correct calendar puts it on that calendar and reserves rooms; the tag is only used in search filters in “Find Events”. - Private Events: For private events using Mountaineers facilities. This tag is used by staff who manage rentals and will exclude the event from the home page and “Find Events”. These events will only be visible to members and the public when they are looking at facilities calendars.
- Activity tags: Instead of using a tag, use the “Activity Type” field to include Mountaineers-sponsored activity categories – this is a primary filter option on “Find Events”. Additional tags can be used as desired to add nuance to Mountaineers activities (e.g. “Glacier Climbing”) or non-Mountaineers activities (e.g. “Windsurfing”), but will only be searchable in the long list of Advanced filters on the “Find Events” page.
- Adventure Speaker: For events featuring a presentation or speaker intended to inspire adventure.
*This tag puts the event in the “Adventure Speakers” page.
- Film Screening: For events featuring adventure or conservation films.
*This tag puts the event onto the “Film Screenings” page.
- Outdoor Leadership: For events intending to invest in leadership skills or promote leader progression.
*This tag puts the event onto the “Leadership Development” page alongside Leadership Development Series and Leadership Conferences.
- Gear Grab: For events intended to help members buy and sell gear.
*This tag puts the event onto the Gear Grab home page.
- New Member Events: For events specifically geared toward new members.
*This tag puts the event on the new member events list on “Getting Started”
Add a Blog Post
 Overview
Blogs are a great way to share what's going on within The Mountaineers and the greater outdoor community. We publish 5-10 blogs per week, some of which are written by our volunteer leaders. Blogs are used to publicize upcoming events, find more participants for courses and trips, share tips and tricks, and share stories from our community. We share all of our blogs on social media, on our main homepage, and on relevant branch homepages to help publicize the amazing work of our volunteers.
Over time, blogs have proven to be the single most effective tool we have to market our opportunities to get people outside. With over a thousand blogs already published, be sure to search our website for existing content before writing your own.
If you're already a leader with The Mountaineers, jump ahead to the "Editorial Guidelines" paragraph to learn how to submit a blog for publication, and get started. If you are not authorized to publish a blog, we encourage you to submit a pitch to our communications director. Generally, our contributors are members of The Mountaineers, or at least directly connected to The Mountaineers community in some way, to give you an authentic voice with our readers. Stories/guides/how to’s need to emanate first from the Pacific Northwest, but can have a broader reach. We are most interested in personal stories of transformative experiences in the outdoors, guides to local outdoor opportunities, how to pieces, and stories from trips taken with The Mountaineers. Pitches should present a clear thesis and should reflect familiarity with the magazine's content and tone. They need to be well-written and free of typos to warrant consideration. To submit a pitch, please email info@mountaineers.org with the following information:
- Article Summary: In 3-5 sentences, what topic do you hope to explore in your article? How is it relevant to The Mountaineers, and how will it benefit our community? Does it directly tie into our mission, or one of our strategic priorities?
- Estimated word count
- Sample paragraph or two, to help us become familiar with your personal style
Editorial Guidelines
We encourage you to be creative with your blogs, as your name will appear as the author for any blog post you add. We want our blog to have a friendly, open voice that is not too technical. We prefer simple, easy to read posts. You may write about anything of interest to you that is relevant to our mission of conservation and recreation. Blogs should be positive, show images where proper safety equipment and skills are being used, and be consistent with our brand standards for communication. Other considerations:
- Word Count: Blogs need to be a minimum of 300 words, and should generally be shorter than 2,500 words.
- Photography: The main blog images need to be horizontal/landscape orientation, with a 3:2 ratio (and a minimum size of 600x400). You can also include photos in the blog, of any dimension. Use our 'insert/edit images' icon at the top of the Rich Text Editor screen to add images. They will default to the largest size. Please do not manipulate this size, as it's optimized to best fit the website layout.
- Layout: Some of our members are savvy with HTML coding, however please type directly into the rich text editor window and use only the formatting options available to you. Blogs will be edited to fit within our current formatting guidelines.
- Links: If your blog is promoting a course, activity, or event, please include links where people can RSVP, sign up, or learn more. If you have used external resources in researching your blog, please cite your sources where applicable. In general, linked text needs to be no longer than five words. Please avoid saying things like "click here for more information" and instead say "visit the course information page to learn more".
process
Admins and committee leaders can write blog posts for submission directly on our website. All of our blogs are reviewed for consistent branding and formatting, and are shared on our social media channels. Select blogs are shared in our emails. Blogs can appear in multiple places throughout the website using 'Categorization Tags', which allow us to share blogs in multiple locations even though they "live" in the main blog content area.
Step 1 Navigate to the main Blog page.
Step 2 Choose "Blog Post" from the "Add new..." menu in the orange admin panel on the left side of the screen.

Step 3 Enter the blog post details. Every blog post contains four elements typical of nearly all our website's content items: Title, Summary, Body Text, and Image. Category, Tags Publication Dates, and Comments are the elements somewhat unique to blogs.
Visit the Default, Categorization, Dates and Settings tabs to enter information. Please refer to our Publication Style Guide for help with these elements and general guidelines for creating Mountaineers content. You will not need to save your work until you've entered information needed on all of the tabs.
- Title: Use something catchy, short, and descriptive. If this is an event, please put the event date in the title.
- Summary: Think of this as the highest level summary of your blog, 1-2 sentences MAX. What is your blog about? Put that here.
- Body Text: This is the bulk of the blog post. Here you can put words that are edited using the rich text editor options. You can also insert images and inbed videos. Use heading style, bold, italic, bulleted lists and numbered lists as desired.
- Body Text “Break”: If you’ve ever reviewed a blog, you’ll notice four dashes within the body of the text, generally after the first paragraph. This is our “trick” for telling the system where to provide a break in content to “Read More” when you’re on the blog digest page (as opposed to the blog content page). You want to add four dashes ("----") after the first 3-4 sentences in your blog. It’s basically our way of telling the system where to put the “Read more…” within the body of the text, it looks like this:
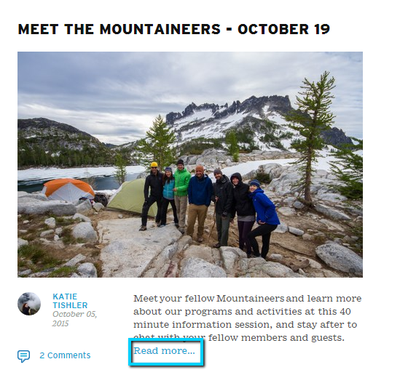
- Images: Blog cover images should be 'landscape' oriented photos, at least 660 pixels wide. Choose a photo that best represents the content of your blog. Note: you may also place images in the body text using the image tool in the rich text editor's toolbar, however you will still need a main blog image to increase the readability of your blog.
- Buttons: To make a button, hyperlink the text using the chain icon in the top left of the formatting bar, which provides you with a prompt to insert your desired link. Once your text is hyperlinked, select all of the text, then go to the top left of the formatting bar above the text box. Click “format,” hover over “button,” and select “blue button.”
- Categorization Tags: For extra credit, you may also assign tags (sometime referred to as keywords) from the "Categorization" tab in the blog post edit form. Please use any applicable tags to increase the likelihood your blog is found in site searches, and that your blog post shows up in the relevant blogs. For example, if you blog about a volunteer need you would like to recruit for, use the tag "Volunteers Needed" so your blog shows up on this page! View all of our tags and how they work here.
- Publication Dates: In some cases you may want to postpone the publication of a blog. You can do this by adding a Publishing Date and/or and Expiration Date on the “Dates” tab on the blog post edit form. Our blog posts should not have an expiration date so they remain published for the lifetime of our site.
- Creator: This will default to your User ID number. You will not see your name listed on this tab but it will show up with a link to your profile once you publish the blog. Do not change the number listed here.
- Settings: We allow people who are logged in to comment on blog posts. If you prefer to turn these "off" for your blog post, uncheck the "Allow comments" checkbox on the "Settings" tab.
Step 6 Review your blog post. If you need to make changes or corrections, click the "Edit" button in the orange admin panel on the left side of the screen.
Step 7 Once you have completed and reviewed your blog post, submit it for staff review by choosing "Submit for publication" from "State" in the orange admin panel. The "State" will change to "Pending review." We do not have a way of notifying staff when a blog has been submitted at present. Please email info@mountaineers.org to notify us that you have submitted a blog. Our team will review for content and formatting, and either publish the blog and let you know that it is live and can be shared, or circle back if larger changes are needed within 48-business hours.

̶Note: Blogs have comments turned "on" by default, but you can turn your blog's comments feature "off" if you wish. If your blog's comments are "on," you will receive email notifications when a user has commented on your blog. If you wish not to receive email notifications when a blog comment has been made on your blog, email info@mountaineers.org. We highly encourage that you keep email notifications for blog comments on so that you can flag any comments that are offensive or inappropriate. Report any blogs with an issue to info@mountaineers.org.
Branch eNewsletters
Each month, the branch leadership team may choose to send a branch email to their members. This process is managed by our staff Communications Specialist. The workflow for branch emails is as follows:
- A designated branch volunteer editor sends a call-for-content to branch leaders, asking them if they’d like to submit any information about branch activities, courses, events, and/or news.
- The branch editor compiles and organizes the submissions into a single document and sends it to staff.
- Staff edits the content, formats it in The Mountaineers email provider, and sends it to branch members.
Branch emails can be sent on the 8th or 24th of each month, and the compiled content should be sent to staff no fewer than four days prior to the send date.
If you’re a leader who’s submitting content to your branch editor, please consider the kind information you’re sending and draft your submission accordingly:
Events, Activities, and/or Courses - 60 words or less
If you’re submitting an event, activity, or course, the goal is to pique the readers’ interest so they’ll click on the link to learn more and sign up/rsvp. An event, activity, or course listing should include ONLY the following information:
Title | Date | Short Description (60 word or less)| Link
Example:

Editorial - 300 words or more
You may want to include a longer form write up about something such as a branch event, a new initiative, or a noteworthy volunteer. The best way to include editorial content (anything 300 words or more) in our enewsletters is to draft a blog on Mountaineers.org that we can link to.
Drafting a blog is easy. You can follow these instructions. Once your blog is live, email the title, intro blurb, and link to your enewsletter editor, and we’ll include it.
We use blogs instead of putting all of the content in the emails because it:
- Keeps enewsletters from getting too long.
- Helps your message go further via the website and social media shares (every blog on mountaineers.org also gets posted to The Mountaineers Facebook and Twitter pages).
- Creates content on the website that can be referenced and shared in the future, helping more people organically discover the great work you’re doing.
Example of how we’d link to your blog:

Quick Note - 300 words or less
You may want include a note that doesn’t warrant a blog, but also isn’t an event, activity, or course. To do this, we can create a bulleted list of notes. Try to keep notes short so as not to overwhelm the reader. You can always link to more detailed info.
Example of a “Notes” section:

Images
You may have specific images you’d like to include. In order to span the full width of the enewsletter, images must be at least 600px wide. If you’re image isn’t 600px wide or you aren’t sure, send it to us. We may be able to combine it with another image or work some other photoshop magic. If you don’t have images, no worries! We can pull from The Mountaineers photo library.
Example of an image that’s 600px wide:
