Field trip: Basic Alpine Climbing Course
Seattle Basic Alpine Field Trip #3 - Rappels, Belays, Climbing, & Anchors - Mountaineers Seattle Program Center
Basic Field Trip #3 - Rappels, Belays, Climbing, & Anchors.
- Sat, Feb 22, 2025
- Seattle Climbing Committee
- Climbing
- Adults
- Moderate
- FULL (48 capacity)
- FULL (15 capacity)
- Fri, Sep 13, 2024 at 1:11 PM
- Thu, Feb 20, 2025 at 5:00 PM
- Cancellation & Refund Policy
- iCal Google
Students with rappelling experience (more than 10 rappels), and are comfortable with rappel start with Station 2, followed by Station 3, Station 4, and Station 1. At Station 1 they can try the 3 locking carabiner alternate rappel. Everyone else does Station 1 as described below.
If you start at Station 4, progression is 4, 1, 2, 3. Start at Station 3, progression is 3, 4, 1, 2. Start at Station 2, progression is 2, 3, 4, 1. Start at Station 1, progression is 1, 2, 3, 4.
Station 1: Rappel Introduction (North Plaza Friction Slabs).
Students at this station make multiple rappels with extension, but without auto-block. Once students show good comfort, then add the auto-block. Students with rigid sole boots may choose to wear hiking boots or running shoes. Idea is to make it easy for new rappellers.
-
Partner check.
-
Safe assembly and use of Personal Anchor System.
-
Rappel with extension, but without auto-block.
-
Rappel with extension, and auto-block only when/if ready.
Station 2: Rappel and Climbing (Outside wall, South Plaza).
-
Partner check.
-
Climbing technique. In control, balance & use of foot holds.
-
Safe assembly, and use of Personal Anchor System for rappel.
-
Safe assembly, and use of rappel extension.
-
Safe assembly, and use of auto-block.
-
Use of rappel commands.
-
Rappel safely, and comfortably with device.
-
Rappel with device while wearing a pack.
-
Demonstrate a leg wrap while on rappel.
-
Demonstrate a Fireman’s belay.
Station 3: Belay Weight Drop and Belay Tie-off (Basement).
The Station Leader/Mentor raises the bag simulating a top-rope belay. Raising the bag is a good time to give the belayer a quick drop. The idea is to give the belayer an idea of the force involved, and the importance of considering the direction of force. Once the bag is raised to the top, slowly lower the bag. Lowering the bag simulates belaying a leader. Surprise the belayer with quick drops only when the belayer is positioned in a safe location.
-
Full Partner check. (see FT1 Station 1)
-
Use of climbing commands.
-
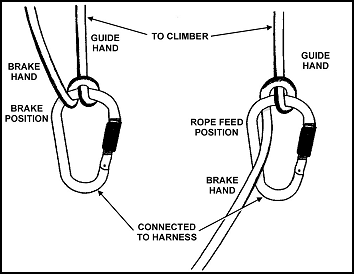
Rope handling and rope management. Keeping a hand on the brake rope at all times, being aware of brake position, and moving hands only when in a brake position.
-
Belayer anchored, or not anchored? When, & why?
-
Belayer position/stance considers direction of force.
-
PBUS belay with device. Note:the acronym fits top-rope belay, but not lead belay.
-
Tie-off the belay to go hands free.
-
Repeat the exercise with a munter belay, keeping in mind that the munter brake position is multi-directional.
Station 4: Multi pitch and lead belay simulation (South Plaza Boulders)
During this station we simulate the mechanics of a multi pitch climb. Note: Basic students will not lead a pitch nor set up an anchor during a Basic climb. This exercise is just a demonstration to understand how a multi pitch climb works and how give the right amount of slack for a leader.
Seattle Program Center 0815. (MORNING!!). This will be a whole day thing, so please bring some food/drink/snacks for yourself.
Required Equipment
Be sure to bring the materials listed below. Mark your equipment so that you will be able to identify it when it gets mixed in with other gear.
- Hiking boots or approach shoes; climbing shoes are optional
- Belay Device
- 2' Prusik Loop, (aka Hero Loop) or Hollowblock or similar
- 2 locking carabiners
- 1 large, locking pear-shaped carabiner
- 6 "general purpose" carabiners (do not need to be oval or solid gate)
- climbing harness
- Helmet
- Belay glove
- 120cm Nylon sewn sling or PAS for rappelling
You will be outside for part of the day. Wear clothing appropriate for a mixed rock and snow alpine climb (No cotton jeans or sweatshirts). Dress warmly enough to be comfortable during inactive parts of the day outside.
