How to Schedule & Manage Courses with Lectures & Field Trips
TABLE OF CONTENTS
- Understanding How Courses are Structured
- Schedule a Course
- Set A Non-Priority Registration Date
- Allow Participants To Join Mutliple Waitlists
- Add/Edit Activity Templates and Schedule Course-Related Activities
- Manage and Share Course Materials
- Manage Course Rosters (aka Course Tracking and Graduating)
- Instructor Registration
- Cancel a Course
- FAQs
- Video Tutorials
However, we don't have the staffing to do this for every volunteer. Posting courses can be one of the more difficult things to do on our website, so please reach out to Member Services if you need help or have questions!
Schedule a course
Step 1: Find the desired course template located in your committee's "Course Template" folder. You'll find a list of your committees on your My Profile page or you can go to the Location & Lodges page.

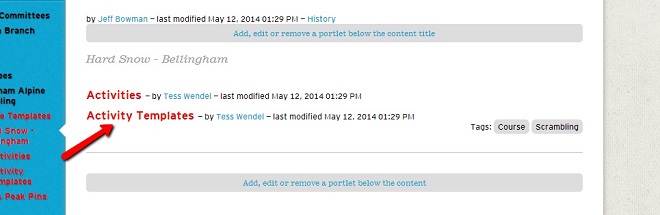
Step 2: Click on the desired course template title. This will take you to a list of previous course listings (Course Subject - Branch - Year), an Activity Templates folder, and an Activities folder.


Step 3: Click Edit in the yellow-orange admin panel to make sure the text in your course template is correct and that any necessary badge requirements are entered.
Course templates should contain information that is consistent from year to year. They should NOT contain things like dates, specific leaders info, or meeting place and time - this information goes into the course listing for a specific year and the field trips you create along with that course.
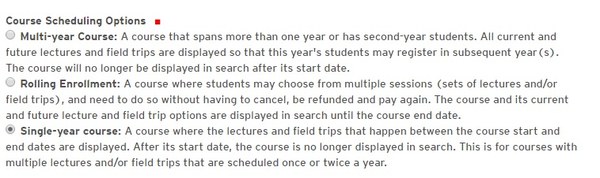
Additionally, make sure to check that the course type is correct. As of March 2016, we have three types of course templates:
When you've completed reviewing the Course Template, click Save at the bottom of the template and it will bring you back to the 'view' of the template.
Step 4: On the orange admin panel, click 'Add New...' and select 'Course'.

Step 5: Enter year-specific information to the form's fields. Information from the template will have automatically populated the form. Add information regarding specific details of that year's course if necessary. Required fields are denoted with "red dots". If you are unsure of how to fill in a particular field, consult our Publications Style Guide and the FAQs below for standards and shortcuts.
Step 6: Verify that the information you entered is correct, then click "Save."
Step 7: Add lectures, field trips, and course materials.
- To make your course complete, add lectures and field trips using the Schedule an activity function. You can read more about this process below. If you are creating a new course with lectures and field trips that do not yet exist, you need to create activity templates to go with your course.
- Add course materials to your course's "course materials" folder.
Step 8: If you are ready to open the course for public viewing go to the yellow admin panel and switch its state from Private to Publish.

SET A Non-Priority Registration Date
We’ve introduced a new activity field called Non-Priority Registration Date. This helps manage trips with priority registration periods.
What is it?
If your activity has a priority group that registers first (e.g., “Priority registration for backpacking students until July 3”), then set the Non-Priority Registration Date to the date when registration opens to everyone (in this example, July 3).
Why does it matter?
- This date ensures that trips are correctly filtered for members who qualify.
- Activities outside the priority period will automatically show the “All Who Qualify” audience tag.
How it works:
- If the field is empty, the system will add the “All Who Qualify” tag when the activity is created. This is how folks will be able to filter trips in the activity search that are not in a priority registration period.
- If you set a date, the tag will appear when that date arrives.
allow participants to join mutliple waitlists
The Mountaineers activity registration pages now allows participants to join more than one waitlist, even if the activities overlap on the calendar, but only if each activity has this option turned on. This gives participants more flexibility while waiting for a spot to open.
Things to know:
- Leaders must check the box labeled “Allow participants on a conflicting waitlist to join this activity’s waitlist” when creating the activity. This setting is not turned on by default and can be found under registration dates.

- To be on multiple waitlists, all of the activities participants are joining must have this box checked.
- Participants can waitlist for multiple overlapping activities, but they can only be registered for one activity at a time.
- Once Participants are taken off a waitlist and registered for an activity, they will automatically be removed from any other waitlists.
- If a Participant wants to join a different waitlist after being registered, they will need to cancel their current registration first.
- There is no limit to how many waitlists can be joined, as long as the above items are met.
When registering for an activity, Look for a yellow message box during registration that says “This activity allows you to be on multiple waitlists”. That means the multiple waitlist feature is active for that activity.
add/edit Activity TEMPLATES And Schedule COURSE-related ACTIVITIES
Before you can schedule a course-related activity like a lecture or field trip, make sure that the activity template exists, is complete and correct, and is in the correct folder. Activity templates are named after the field trips and lectures. For example: Basic Rock II, Field Trip 3, Gear Check Session, etc. The information housed in the templates should be information that remains the same year to year for that lecture or field trip.
How To Add And Edit Activity Templates
There are at least two folders in each course template: Activities and Activity Templates. Don't see these two folders? Please create them by clicking 'Add New...' and choosing 'Folder.'
How to create an activity template: Once you are in the Activity Templates folder, click 'Add New' in the orange admin bar and select 'Activity Template.'
How to edit an activity template: Clink on the name of the activity template you need to edit, then click the "Edit" button in the orange admin panel.

Activity templates are like course templates and should contain information about what curriculum and skills are covered during the activity but NOT have specific dates, meeting place and time, leader's names and contact info, etc. because you are likely going to reuse this template from year to year.
note about activity requirements
There are three different types of activities for courses, as shown in the screenshot below:

If you choose 'Required: one activity scheduled, all must attend.' course participants will be automatically registered for the activity when they register for the course.
If you choose 'Required: multiple activities scheduled, students choose one,' course participants will have to choose the option that works best for them when they register for the course.
If you choose 'Optional: students may register for any scheduled activities,' course participants have the option of registering but do not have to register for those activities to complete course registration.
Schedule Course-related Activities
Once an activity template is created, you will schedule the course-related activity the same way you schedule a regular trip.
Go to the 'Find Routes and Places' page where there is a list of Routes and Places where your field trip or lecture could take place. Search for the location where you'd like to host the activity, or narrow down the list using the filters on the left of the page.
Once you find and click on the desired route/place, you'll see the Schedule an Activity box on the right side. Select the 'Course-related activity' button, and select the course from the searchable drop down list. Just start typing in the name of the course and it will populate the most similar course titles. Watch a video tutorial.

The next page will prompt you to select the activity template. After that, fill in the remaining activity specific details and save the activity.
When members and guests register for a course they will see the entire list of activities you scheduled. Participants will automatically be registered for any 'Required: one activity scheduled' activities, and may choose among required activities with options and optional activities if they are open for registration.
Manage and SHARE Course Materials
It's easy to share documents like lecture slides or field trip documents with everyone in the course. Simply go to your course, click on the blue 'Course Materials tab and then click on the "Manage Course Materials" tab/button. You can add files or make folders for files. It should hold all of the documents students need for a course. These materials show in the “Course Materials” tab on the course listing.


Want to restrict access of the course materials to individuals who are leading or assisting with your course? Go to the course page and click the blue "Course Materials" tab, and then the "Manage Course Materials" button.

You'll see the "State:" drop-down menu in the upper right-hand corner of the page. Click the arrow and select "Share with committee" or "Private" in the drop-down menu. “Shared With Committee” is the best of these options. It provides other committees with access to your course documents, which can be beneficial in many ways. Once you've changed the publication state, people with insufficient privileges they will see this message if they try to view your course materials:

If you want to make the materials viewable by everyone again, go back to the Course Materials tab, click "Manage Course Materials," and then change the State back to "Published." If there are documents from years past that you might not want to appear in the current year’s course, but don’t want to delete, change the publishing/expiration date of individual documents by checking the box next to the document and clicking "State".


Manage course rosters
Course roster
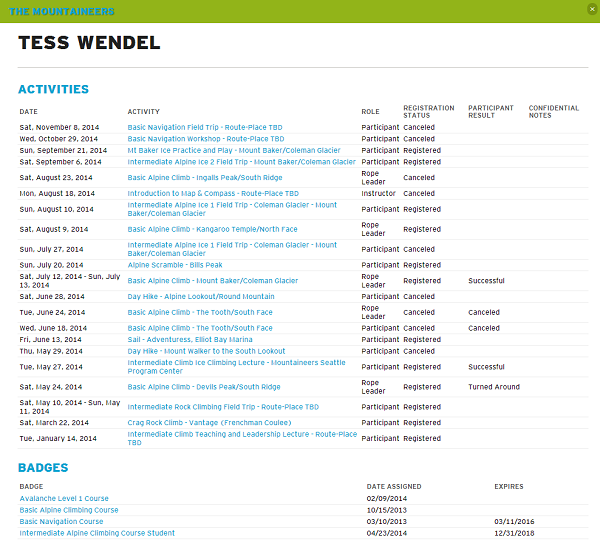
To view a course roster, click on the course in the course template folder or from My Courses on your profile page. Then click on "Roster" in the orange admin panel. On the roster page, there is one green button at the top for adding a person to the roster. Scroll to the bottom of the page to find blue buttons for sending emails to course participants, copying participant emails, processing group graduation, student badge expiration dates, and downloading the roster and activity data.


Registration statuses and EDITING
If your course has a fee and you would like to waive the fee for someone, add them to the roster manually as "registered." If you want to hold a spot on the roster for them but allow them to pay online, add them to the roster with a status of "Offered." Offered statuses last for 5 days. If the participant does not complete registration after 5-days, the offer will be cancelled. An automatic email is sent to participants who are given an offered status.
To edit an individual's status, use the "Edit" and "Review" links on the roster page. As it does for activities, the "Edit" link allows you to edit the student's course registration.

Use the "Review" link to see the activities completed and badges earned to determine whether the student has fulfilled the graduation requirements.
Course Template Roster
When viewing the course template (not a certain year's course offering), click on "Roster" in the orange admin panel. This roster is a compilation of all of the course rosters housed within the course template. You can take all of the same actions as with a course roster except that you cannot add someone. An individual can only be added using a course roster.
This "mega roster" has filters that allow course leaders to find graduates and instructors from multiple years of courses for instructor recruitment more easily. It allows filtering by membership status, role, and course start date. You can also look up individuals by name to see when they were a student in the course or which years they previously instructed. You can email directly from this roster or simply download the list.


Remember when emailing people from this list make sure to include a notice at the top of the email letting people know why they are receiving this email. We encourage only bulk emailing those who are current members. This is important because this email is not like an email newsletter so there is no way to opt out of these emails.
Graduate your students
When a student has fulfilled their requirements for the course you'll want to graduate them. To graduate a student, click on the "Edit" link next to their name on the course or course template roster and pick "Graduate" from the drop down menu, then click the "Save" button. You can also do this in "batches" of students using blue button at the bottom of the roster that says "Change Role or Expiration." Once graduated, they will automatically receive the course badge. The student badge will not expire until the end date listed for the course has passed, unless you manually change the date using the same button.

Instructor Registration
Instructors can search for activities and register to participate. On the Volunteer with Us page, you will see a link to Find Instructor Opportunities. For your activity to show up in this search, it is important to fill in instructor pre-reqs in the activity template for your field trip or lecture.
There are two different ways an instructor can sign up to help out for trips related to a course.
- Instructors can sign up by going to the instructor opportunities link.
- If you are listed as an instructor on a committee, you can sign up for the course the same way participants do but you have to be listed as an instructor on the committee. If you are not on the committee roster for the committee sponsoring the course as an instructor please contact the committee chair.
- When you are building your course activities, and as you post a new course online, remember to list the number of instructors you need on the "registration" tab of the course activity (for example, I need 20 total people, five of whom are instructors).
Cancel a Course
To cancel a course, click Roster in the yellow admin bar and scroll to the bottom of the screen. There will be a big blue button that says Cancel Course. This will trigger an email to Member Services letting us know to refund participant's registration if necessary. If there are specific refund instructions (say you are only refunding 50% of the fee) please email info@mountaineers.org with the name of the course and refund instructions.

FAQs
Course titles have three parts: Course Subject, Branch, and Year. You may edit the course title, but please only change the year if needed. For example, you may be scheduling a course for 2014 in 2014, or you may offer spring and fall sessions of a course and need a finer distinction in the title.
If you use the same course template the activities associated with that template will populate every course listed using that template. It might make sense to create a different course template or think about a different way of structuring your course such as using rolling enrollment.
The course start date should be the date of the first activity. The end date can be the final activity, except in the case of courses with 'student' badges. If the course has a "student" badge attached to it, the badge will expire on the end date listed for the course. If you are scheduling a class that requires experience outings to graduate, then you may want to extend your class to the end of the calendar year so that students have enough time to complete their graduation requirements.
- "Required Books" are those that your students must read in order to receive all of the information necessary to achieve competency in the skill you're teaching -- and as a reference for when they practicing on their own.
- When you include a required book (and/or map) in your posting, your students will be offered the book at the point of check out, along with their course registration.
- If you would like to receive a Mountaineers Books title for use in your course for free, email our publisher at the link provided and they will send you a free book to review.
- "Recommended Books" are additional, supplementary information that your students could benefit from but that is not required.
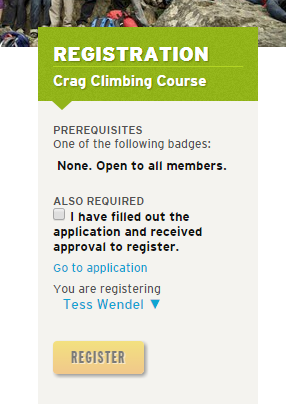
- Check the "Application Form Required?" box.
- Below this checkbox there is a field to enter the URL of the application form. There are several websites you can use to create an online application, ask your committee chair or other course chairs for suggestions if you need them. If you'd like to keep the applications you've received in one place, you can create a folder in the course template for storing application forms.
- Required: one activity scheduled, students choose one: If you are only offering one Overview and Gear lecture at the beginning and it is mandatory for all participants to attend. This will automatically enroll all students when they sign up for the course.
- Required: multiple activities scheduled: If you have multiple days that you are offering the same field trip but it is required for all students, students will have to choose one of the options. Make sure you have enough space on the combined field trip rosters to equal the course size.
- Optional: students may register for any scheduled activities: If you offer a conditioner, special play day, extra practice session or camp out that not everyone is required to attend or if you are scheduling lots of activities using the same template (like the Conditioning Hiking Series) and participants will register for multiple ones under the same template.
Do my course participants have to contact member services to cancel themselves from a course with a fee? No! Course participants can now simply log in and click the blue Manage Registration button on the course site to cancel themselves off a course and a message will be sent to member services to process a refund. We'll contact you if the course has already started about whether to issue a refund.
My course is over. Do I have to close it out?
No, you don't have to close out the course. That is accomplished by the course end date. The only action you need to take once the course is over is to graduate your students. If any of them were unsuccessful, leave their status as registered. If someone needs extra time to complete the course, you can extend their student expiration date.
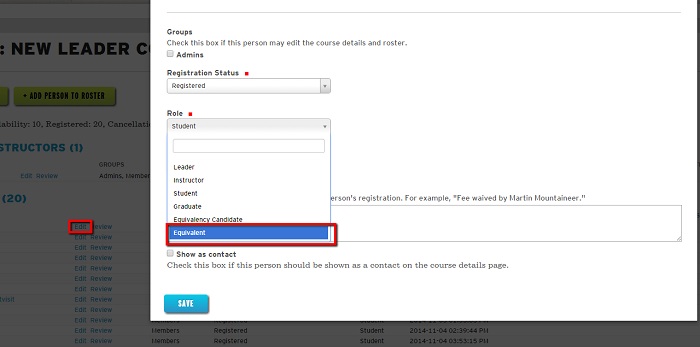
You'll need to add them to the current course roster and choose "Equivalent" as their "Role." If you have have many to whom you grant equivalency, have an evaluation session or need to charge a fee for equivalency, you may set up a course to manage them as a separate roster. If you have an enrolled badge, like the basic sea kayaking student badge, this would be given to someone marked Equivalency candidate versus Equivalent which has the same status as a Graduate and would have the Basic Sea Kayaking course badge.
I don't have an image for my course or activity template, where can I find a default image?
Download the gray landscape image or the spiral notebook educational image.