How to Schedule & Manage Activities
| If you're a leader and you already know what to do... | schedule an Activity | |
Otherwise, read on to learn how to schedule and manage your activities.
Not sure if it's an activity? Learn about the differences between events, courses, and activities.
Table of Contents
- Non-Priority Registration Date
- Allow Participants To Join Mutliple Waitlists
- Quick Guide to Scheduling an Activity
- Route & Places
- Activity Templates
- Clone an Activity
- Edit an Activity
- Manage a Roster
- Cancel an Activity
- Close an Activity
- File an Incident Report
- Mentoring New Leaders
- FAQ
SET A Non-Priority Registration Date
We’ve introduced a new activity field called Non-Priority Registration Date. This helps manage trips with priority registration periods.
What is it?
If your activity has a priority group that registers first (e.g., “Priority registration for backpacking students until July 3”), then set the Non-Priority Registration Date to the date when registration opens to everyone (in this example, July 3).
Why does it matter?
- This date ensures that trips are correctly filtered for members who qualify.
- Activities outside the priority period will automatically show the “All Who Qualify” audience tag.
How it works:
- If the field is empty, the system will add the “All Who Qualify” tag when the activity is created. This is how folks will be able to filter trips in the activity search that are not in a priority registration period.
- If you set a date, the tag will appear when that date arrives.
allow participants to join mutliple waitlists
The Mountaineers activity registration pages now allows participants to join more than one waitlist, even if the activities overlap on the calendar, but only if each activity has this option turned on. This gives participants more flexibility while waiting for a spot to open.
Things to know:
- Leaders must check the box labeled “Allow participants on a conflicting waitlist to join this activity’s waitlist” when creating the activity. This setting is not turned on by default and can be found under registration dates.

- To be on multiple waitlists, all of the activities participants are joining must have this box checked.
- Participants can waitlist for multiple overlapping activities, but they can only be registered for one activity at a time.
- Once Participants are taken off a waitlist and registered for an activity, they will automatically be removed from any other waitlists.
- If a Participant wants to join a different waitlist after being registered, they will need to cancel their current registration first.
- There is no limit to how many waitlists can be joined, as long as the above items are met.
When registering for an activity, Look for a yellow message box during registration that says “This activity allows you to be on multiple waitlists”. That means the multiple waitlist feature is active for that activity.
Quick Guide to Scheduling an Activity
Step 1 - Select where the activity will happen
Go to the route/place page to search for your activity location. Once you find the route/place location, click the route/place title to view the route/place information. If you cannot find the route/place you are looking for, contact Member Services for assistance or request a new or updated route/place.
Step 2 - Schedule the activity
First, choose the nature of the activity. If it is a standalone activity (a hike, climb, scramble, etc. not related to a course), use the 'trip' option and select the sponsoring committee. If it is a course-related activity or a seminar/clinic, choose one of those options and select the corresponding course/committee.
Next, enter the date range for your activity. You can enter the same start and end date if it is a one day activity.
Step 3 - Choose the activity type, course activity template, or seminar/clinic template
For standalone activities, the activity template is essentially the "type of activity". For course-related activities, the list contains the lecture and field trip activity templates for the course you chose. If it is a seminar/clinic, the list will contain seminar/clinics from your committee's seminar/clinic templates folder. Activity templates dictate the badge prerequisites for your trip (i.e. if you pick an alpine scramble it will require an alpine scramble student or graduate badge).
Step 4 - Add specific activity and registration details
Please refer to our Publications Style Guide for "spelling and grammar" guidelines, and read about how to write a great activity listing on our blog.
A fee field appears on this page, but most activities should be free. If you plan to charge a fee, please consult staff and your committee. When fees are involved, your activity is likely best scheduled as a course, clinic, or seminar.
If you're starting at the same trailhead as the route/place but will be going to a different destination than the route/place title indicates, you can select an 'alternate route/place title' from a list. Visit the "Route/Place" tab on the activity's edit form and look for the "Alternate Route/Place Title" field. If there isn't one or if you think it's missing an alternate title, please let us know.
Also note that many defaults like activity type, difficulty, mileage, and elevation gain come from the activity template and route/place. These are just defaults, so be sure to edit them as needed for your activity.
Step 5 - Click Save.
Step 6 - Add leaders to the activity.
Step 7 - Close your activity once completed.
NOTE: Activities may only be in the published or closed states. Though other states are possible because they are a native part of our website, states other than published and closed cause several issues for our volunteers and members. Activities are published automatically when added. Please be sure to leave all activities published until they are complete and it is time to close them. This includes activities that need to be canceled—set their trip result to canceled and then close them.
Routes & Places
 Routes & Places are where we go and where we gather. They are part of every activity and the first step in scheduling an activity. Hiking trails, climbing routes, ski trails, waterways, our program and outdoor centers, local parks, and much more can all be found in Routes & Places. Each route or place contains information to help with trip planning including mileage, elevation gain, difficulties, maps, recommended guidebooks, and trip reports.
When scheduling an activity at a route/place, enter the date(s) for your activity in the "Schedule an Activity" widget. If the activity is a lecture, practice session or field trip, choose the "Course-related activity" button and the already-scheduled course from the drop-down list. For example, a Basic Climb of Mount Baker/Coleman Glacier is a "Standalone activity", or Trip, and the Basic Knots & Belay Escape Field Trip at the Tacoma Program Center is a "Course-related activity."
Most locations allow only one Mountaineers group at a time. If this applies to your selected location, the system will automatically check your selected dates for scheduling conflicts. To avoid overlaps, review the "Activities" tab on the route/place page to see existing bookings.
If the location permits multiple Mountaineers groups, you'll see a "Multiple Bookings Allowed" message. However, if the location also requires external reservations (e.g., city park picnic shelters or library meeting rooms), it’s your responsibility to secure the space through the appropriate reservation system. Be sure to consult the “Land Manager” link or route/place details for reservation guidance.
Anyone may suggest a new route/place, and suggest edits or add pictures for routes/places that already exist, using the Route/Place Updates, Images & Resources Form.
Leaders may request a new route/place using the Routes & Places edit form.
Alternate Activity Titles
Routes & Places that leave from the same starting point and utilize the same route but go to a few different destinations have alternate titles that leaders can pick from if the general title is not descriptive of the activity they are doing.
For example, if you are leading a trip and the route/place is listed as Camp Muir & Anvil Rock, but you're only going to Camp Muir there should be an option to change the title when editing your activity to reflect that you are only doing Camp Muir:

Activity Templates
Activity Templates are what we do. They contain default information for the activity and prerequisite badges for participants, leaders or instructors.
For a "course-related activity" (lectures, field trips, and optional course activities) you will select from among the activity templates available for your course. Visit the Scheduling a course page for more information.
Visit our Activity Overviews pages for information about activity templates for outings.
Clone an Activity
Some activities may be cloned, based on a route/place setting that allows activities at that location to be cloned. Remember that an activity is made from an activity template and a route/place, so the combination of these two elements needs to be clonable.
Routes & Places that may be used to clone Activities
- Seattle Program Center
- Tacoma Program Center
- Kitsap Program Center
- Baker Lodge
- Meany Lodge
- Stevens Lodge
- Kitsap Cabin & Forest Theater
- Online Classroom
- Boston Harbor Vicinity
- Carkeek Park
- Snoqualmie Summit Ski Areas
If there is another route/place that you think should be allowed to be cloned, send an email to info@mountaineers.org with a link to the route/place and why you think it should be allowed to be cloned.
Note: The cloning process does not do the conflict check, so we typically need to limit the Routes & Places where we allow activity cloning to facilities where a reservation is required as a means of doing the conflict check. Adding conflict checking to the activity cloning process requires significantly more website development in addition to the user interface design (i.e. how do we handle and display clones where there is a conflict?). The system we built handles the vast majority of cases where we want to create several clones at once, and we have an item on our list for developing a one-at-at-time clone that does the conflict check which is much easier than the multiple clone with conflict checking.
how to clone an activity
Step 1 Open the activity you want to clone.
- Most likely it's an activity you led in the past, and the best place is your My Activities page.
- If not and it's a trip, clinic, or seminar use the Find Activities search (you may need to the "Starting..." filter to find an activity that is in the past).
- If not and it's a course-related lecture or field trip, try the Find Instructor Opportunities search (you may need to the "Starting..." filter to find an activity that is in the past).
Step 2 Click on "Actions" in the yellow admin bar and choose "Clone."
Step 3 Complete the fields on the clone form.
Step 4 Click the "Add Another" button to add another clone. Repeat Steps 3 and 4 to add as many clones as needed.
Step 5 Click the "Clone" button to create the clones.
Step 6 Update the newly added activities if needed.
Edit an activity
To edit an activity, find the activity on your My Profile page's My Activities section or from an activity search. When viewing the activity, click on the "Edit" button in the orange admin panel on the left side of the screen. You may change anything about the activity except its Activity Template. If you chose the wrong activity template (i.e. you chose Intermediate snowshoe instead of Basic) you'll need to contact Member Services to re-select the right one.
View and ManagE Rosters
To view or manage a roster, first find the activity on your My Profile page's "My Activities" section or from an activity search.
Activity Participants
Anyone logged in may view the blue roster tab in 'view' mode of the activity. The names of all who have registered appear on the roster. Your name and avatar link directly to your profile. If you wish to make your membership "Private," you can go to Edit Profile and check the "Make My Membership Private" checkbox.
Activity Leaders and Administrators
Leaders and committee administrators may view more detailed information, download the activity roster, email participants, add people to the roster, and cancel people from the roster by clicking on the "Roster" button in the orange admin panel on the left-hand side of the screen.
There is also a "Review" link for each individual on an activity roster. This allows leaders to review and individual's activity history and participation notes directly from the roster. Viewing participation notes is helpful for trip planning, ensuring safety during a trip, as well as positive group dynamics.

If you need to change the Primary Leader, edit the activity and choose the new leader from the "Primary Leader" drop down.

Leaders, instructors, and committee members with administrative privileges can view participation notes. If a participant has administrative privileges on a committee, they can see their own participation notes. All others members who are not on committees with administrative privileges cannot see participation notes. This is also true for course rosters.
To re-open activities administrators have to change the state from "Closed" to "Published."
Close an Activity
Once an activity is complete, it will need to be closed by the activity leadership. Closing it allows you to:
- Add last minute registrations and record cancellations.
- Set the Trip Result (successful, turned around, or canceled). This will automatically set all Participant Results to that status.
- If a participants needs a different status based on their performance, please click Edit or Cancel to set the Participant Result. There are seven choices: Successful, Turned Around, Needs Improvement, Failed/Unsafe, No-Show, Waitlisted, and Canceled.

- Make notes about participants via the Participation Notes (these notes are visible to other leaders so they can help plan safer trips and be prepared to accommodate students). These participant notes should be strictly objective. Examples could be "Student struggled with rock scrambling section, advised more scramble experience before future climbs." NOT "Student is horrible climber."
- Award skill badges. When an activity is closed, participants can be automatically awarded any skill badge that is associated with the activity on the template level. If you do not want a skill badge to be awarded to a participant or would like to assign skill badges to a select few, you must manually edit their participation details and add or remove the appropriate badges from the "Badges to Assign" menu.

- Send an incident report to the Safety Committee if there was a safety incident.
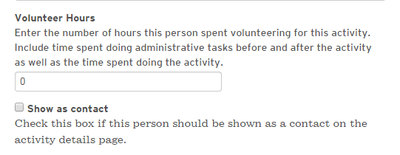
- Enter volunteer hours you and others spent organizing and running the activity
- If your trip ended up having a different mileage or elevation than originally planned, you can edit the activity and update that information (see above). That happens on a different screen than where you close the activity.
To close an activity, find the activity on your My Profile page's My Activities section or from an activity search. On the roster under "Set Activity Results," you can choose a Trip Result, then click the "Save" button. If someone should have a different Participant Result than the Trip Result, click Edit or Cancel next to their name and select the appropriate result. Additionally, you can write a note about their participation in the Participation Notes section.

Once the roster accurately reflects each participant's status, return to the activity page. When viewing the activity, click on the orange "Close Activity" button in the "Manage Activity" section on the right side of the screen.
To find a list of your open activities, please visit the "My Activities" area of your Mountaineers profile, and use the checkboxes to filter to show only open activities, as shown below.

cancel an activity
To cancel an activity use the "Closing an Activity" process above, choosing "Canceled" from the "Trip Results" drop down menu and click save. Then click the "Close" button down at the bottom. Closing an activity is required for canceled and successful activities alike. If an activity that has been canceled is not closed it will continue to present a route/place conflict if someone else tries to schedule a trip at the same location.
File an Incident Report
To learn how to file an incident report, visit this Safety blog!
Mentoring new Leaders
There are a few features on our website to help committees track and on-board new leaders. These tools will help you track and manage leaders as they go through the mentoring process.
Adding new mentored leaders to the committee roster
- Although you do not have to add a leader who is being mentored to your committee's leader roster, not adding the mentored leader prevents them from seeing and doing things on the website like adding and managing activities. For the best mentored leader experience, it's best to add them to your committee as a leader.
- When you add mentored leaders to a committee roster and check the "Leader" box, you can prevent the default leader badge from being assigned to them by checking the "Prevent Assigning Leader Badge." This checkbox is just under the Leader Expiration Date. This allows the mentored leader to schedule their mentored activities, but prevents them from having a leader badge until they've completed the leader requirements.
- When you add a new mentored leader to a committee roster, add a note that they are being mentored, who is mentoring them, and any other information that is appropriate.
- Leader Expiration Dates on committee rosters are optional. They help committee administrators when they periodically review and update the committee roster. When an expiration date passes, the leader is NOT automatically removed from the committee roster, and they do NOT lose their privileges to schedule and manage activities. This feature is only for administrative tracking purposes.
When Scheduling a Mentored Leader Trip
Update October 2024: The new activity role option, Mentor, is now available for selection within the Activity Role options. While the "Mentored Leader" role remains for now, the Mentor role has been introduced to clarify the distinction between the Mentor (who provides guidance) and the Mentee (aspiring leader who has historically been listed as the Mentored Leader). Our goal is to eventually phase out the Mentored Leader role as groups transition to this new process. We encourage committees to list the Mentee as the Primary Leader, and the Mentor as the Mentor to ensure the Mentee gains the full leadership experience.
We’ve also introduced a new feature that allows the registration page to notify Co-leaders or Mentors about roster changes. When scheduling activities or courses, leaders will now see a checkbox to opt-in to notifications, helping to improve communication and coordination among leadership teams.
- The mentee can be the Primary Leader for an activity, as long as the mentee is on the committee's leader roster. When scheduling an activity, the website defaults to listing the logged-in user as the Primary Leader, but other leaders on the committee's roster appear in the drop-down menu when adding and editing the activity.
- List the Mentee as the “Primary Leader”, list the leader who is providing guidance to the mentee as the “Mentor”.
- Checking the "Admin" box on the activity roster for a leader gives that leader administrative privileges for that activity. Primary Leaders automatically receive administrative privileges, but they can grant those privileges to other leaders (e.g. Mentored Leader, Mentor, Co-Leader, Assistant Leader, etc.) by checking the "Admin" box for that leader.
- Check the "Show as contact" box on the activity roster for either or both the Mentor and Mentee/Primary Leader. Whoever has this box checked is displayed on the activity detail page on the right-hand side, just below the registration portlet.
FREQUENTLY ASKED QUESTIONS
Why is it important to schedule activities online?
1) Leaders are protected under The Mountaineers insurance policy - if an activity is NOT listed online, the leader is NOT covered by the organization's insurance policy.
2) It ensures we don't have multiple Mountaineers groups on the same route or at the same venue. Please note that if either a stand-alone trip or a course-related activity is scheduled the route conflict check will still occur, it will still show a conflict if you try and schedule a stand alone trip. The type of activity does not matter. This reduces our impact on the places we visit.
3) Our Member Services team relies on the accuracy of our website to answer questions that come in via email or over the phone. We can provide the best customer service if we have access to correct information.
4) It helps facilitate action should an emergency occur. Precious time can be lost if an emergency has taken place and you do not have emergency contact information accessible for our response team to utilize. Please include all participants and instructors on your rosters.
5) For courses, it makes it clear to the participants what they have next on their schedules because it shows up in the "My Courses" and "My Activities" area of their profile page. This helps prevent last-minute cancellations due to folks in courses double-booking themselves.
6) Reporting purposes as detailed below:
- Leader recognition - Our leaders donate huge amounts of times to our programs and we want to recognize those contributions.
- Matching funds and grants - Being able to report volunteer hours more accurately is also incredibly powerful for Mountaineers getting grants and for members getting their employers to match the time they donate with financial contributions.
- Incident reporting - This allows reliable documentation and analysis for future learning in case of an emergency or incident.
- Land Managers - we have specific permitting requirements and need to know how many groups, are going where, so we can effectively petition for more user days(for you!) and comply with legal regulations.
Do I use instructor or assistant leader for my rope leader designation on basic climbs?
Use the assistant leader for rope leader designation. Please note that when filling in the instructor/assistant leader field on an activity listing you'll want to enter the total number of co-leaders, assistant leaders and mentored leaders needed to help with this activity. The capacity defaults to 0 for this field (assumes just a single primary leader per each activity). If you don't need any helpers, leave the leader capacity at 0. If you do want helpers you’ll need to count yourself as 1 plus however many helpers you have.
The wrong prerequisite badges are showing up for the activity I just listed, how do I fix that?
The badges come from the activity template that is picked from the drop down menu on the second page of scheduling an activity. To change the activity template please email info@mountaineers.org.
View all activity types here, with information on prerequisites, difficulty ratings, etc. if unsure about which template to use.
How do I make my mentored leader show as the contact person and how do I award them volunteer hours?
Click the Edit or Cancel button next to their name and make sure the box is checked next to show as a contact. You can uncheck the box on your listing so that only they show. However, if your trip requires leader's permission please keep in mind that requesting leaders permission directly from the website is set up to go the email of the Primary Leader.
The Volunteer Hours box below awards a set number of hours to people listed as leaders and instructors on an activity. However, if you want to individually award hours of different amounts to your leaders you'll want to use the Edit or Cancel button next to their name to log those hours on an individual by individual basis.