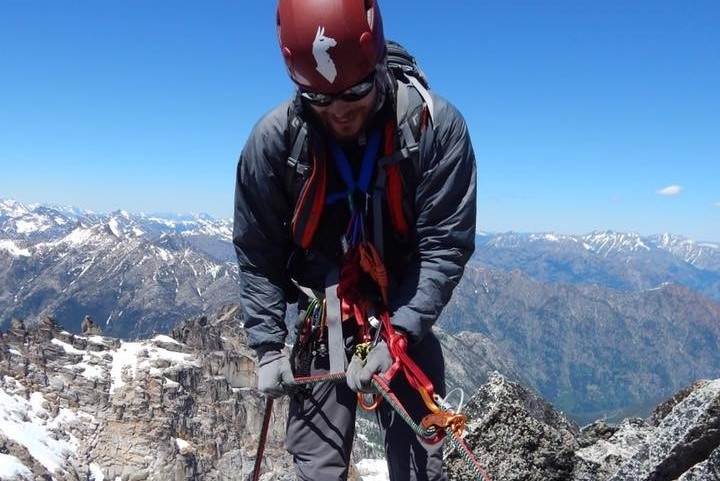
The Mountaineers recommends using a dedicated extension when rappelling in an alpine setting. This method provides maximum flexibility and efficiency, allows you to move freely near the anchor while being clipped in, and maintains the extension within arms reach while on rappel.
Extending a rappel has become standard practice in many alpine contexts because it allows clearer visibility of the system, puts the brake hand in a natural, comfortable position, and allows for easy management of an autoblock.
Many climbers use a Personal Anchor System (PAS) as one of two dedicated points from which to secure themselves to the anchor. In order for the PAS to remain a dedicated anchor, in general it should not be duplicated as a rappel extension, as a rappel extension is not an anchor system. The PAS should remain independent of the rappel set-up. This independent PAS also provides greater range of movement at the anchor.
The set-up
WHILE WAITING
- Attach PAS to anchor.
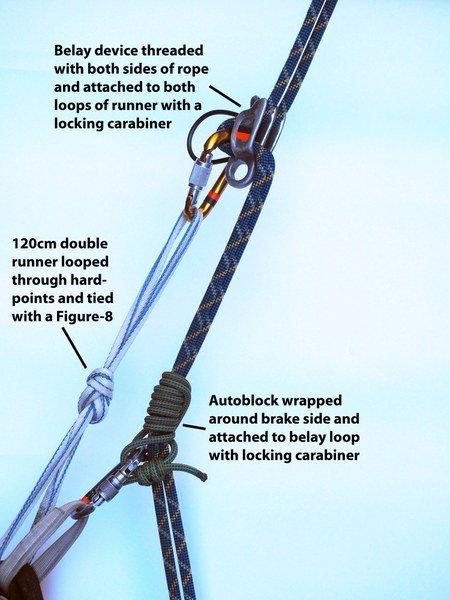
- Thread half of a double-length (120 cm) sewn sling through harness hard points and tie both ends into a figure eight on a bight.
- Add carabiner and device through both distal loops.
- Tuck hair and any loose objects out of the way.
WHEN NEXT UP TO RAPPEL
- One can attach the autoblock and carabiner to the rope while the preceding climber is on rappel.
- A properly sized autoblock will not slide down the rope when left on the rope.
SETTING UP
- Attach autoblock to belay loop with its locking carabiner.

- Pull rope up through autoblock to form bight of rope for threading device -the autoblock holds the weight of hanging rope strands.
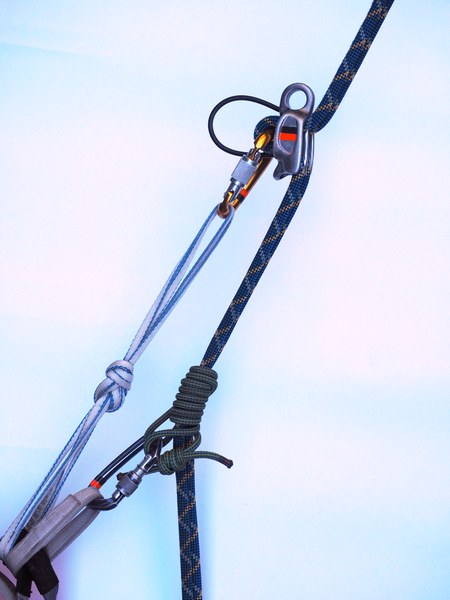
- With device located as close to anchor as practical thread rope bight through rappel device.
- Clip device into both distal extending sling loops with carabiner.
- Lock the carabiners.

Note that a toothed device, such as the Black Diamond ATC-XP can be set up with less friction (above), or with more friction by placing the brake strands along the teeth (right).
TESTING
- Review the system in a serial manner from anchor to landing: SERENE anchors, rope threading, autoblock, device, carabiner, belay loop, harness, stopper knots and landing.
- Slide autoblock up toward device, and with gloved brake hand on both strands and being careful not to tension the PAS, loosen brake hand enough to weight the autoblock to make sure it will hold and that it cannot not reach into the device to defeat the autoblock.
- With braking applied, slide autoblock down to create enough slack to body weigh the device while being careful not to tension the PAS or autoblock.
On Rappel
STARTING RAPPEL
- With brake hand on both strands well below device use other hand to remove PAS from anchor and stow.
- Use brake hand to maintain friction.
- Place non-brake hand on autoblock and begin sliding it.
- To begin descent reduce friction in brake hand while sliding the autoblock.
WHILE RAPPELLING
- One hand slides the autoblock while the other hand controls the braking friction on both strands of rope.
- To change hands remove hand from autoblock and transfer brake control from one hand to the other, never letting go. Original brake hand will now manage autoblock.
- If additional friction is needed slide brake hand under climbers seat.
- In an emergency, or to engage the autoblock, let go of the autoblock while maintaining brake hand friction. Lessen friction only after autoblock is securely holding the rope.
- To go hands free first assure the autoblock is holding. A leg wrap can be added for a greater security to the autoblock. To go hands free while hanging a back-up leg wrap is used as a back-up.
Advantages of this system
Advantages of the independent PAS
- Keeping a Personal Anchor System separate from other applications helps to manage risk for the novice climber.
- The independent PAS has greater extension for reaching anchors off to the side or further away. The greater length gives the waiting rappeller more mobility at the anchor.
Advantages of a dedicated extension
- Since the formed figure eight on a bight has two redundant strands, any webbing material will work; it doesn't need to be sewn.
- Choosing a point near the anchor to thread the device assures the PAS will be long enough to test weigh the rap system before the PAS is removed without having to wrestle the threaded device up the rope closer to the anchor because the PAS length was insufficient.
Advantages of this method of tying
- Unlike in the earlier version where a double sling was girth hitched to the hard points, with this method, the location of the knot forming the loops isn't critical.
- After weighting, a knot in 4 strands is easier to untie than a knot in 2 strands.
- The extension is shorter and will be within reach of the rappeller’s hands to better help keep it from catching on a feature, becoming unreachably stuck in a crack, attaching a prusik above the device to bypass a knot and making it easier to perform a sit and spin start.
other advantages of this method
- The next in line rappeller can place their autoblock on the rappel rope. Doing this all but eliminates the argument that an autoblock is too time consuming.
- Using the autoblock to hold the weight of the hanging strands while the device is being threaded is a time and hassle saver; it is much easier than trying to thread the device while managing a weighting rope. This is especially true when fighting the weight of 2 hanging ropes.
- In the original extension technique, when the brake hand was also controlling the autoblock the brake hand was restrained by the length of the autoblock in being able to extend down and around hip to increase braking friction.
- When squarely facing the rock face it doesn't matter which hand is used where. If facing more toward the side then the upper hand is on the autoblock and lower hand is braking. In general, there should only be modest drag from autoblock friction; it should not be enough to influence normal rappelling brake hand friction.
- Using 2 hands provides the smoothest autoblock motion and maximizes the brake hand ability to slide down the rope and under the climber’s seat to add friction.
Other options for dedicated extensions
A single sewn sling girth-hitched into the hard points, without any tied loop, will also work but, in theory, is more susceptible to failure. Single is easiest to inspect from a distance.
The AMGA offers several options for a dedicated extension, however The Mountaineers recommends that novice climbers focus on mastering the use of a 120 cm sling:
Other factors yet to be tested
In the event a cut rope end on one strand should get past the brake hand, it's unknown whether the autoblock would engage before the cut rope end slips through it.
Add a comment
Log in to add comments.The disadvantages of a dedicated PAS (separate from the extension) were not listed and they far outway any advantages of using the two separate ones described in this article. The information listed about needing two separate PAS' does not follow standard/ general excepted practices.
 The Mountaineers
